


How To Measure For Custom Wainscoting Made Easy!
10 steps for measuring a standard room for Custom Wainscoting
At Wainscoting America we pride ourselves on making your wainscoting solutions fast, easy and affordable. Our online design system will help you design your panels and allow you to adjust all the wainscoting attributes in minutes.
This Wainscoting example will walk you through an actual dining room project that was implemented by one of our many Do IT Yourself (DIY) satisfied customers.

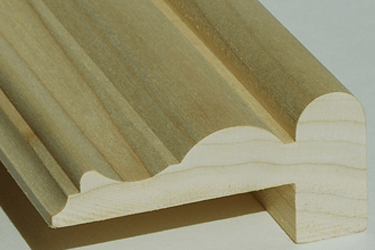
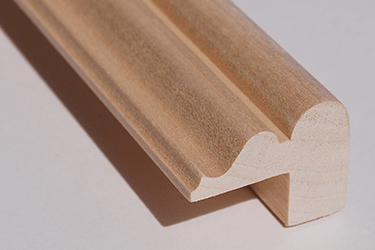
1) Choose the wainscoting panel style and top cap molding style
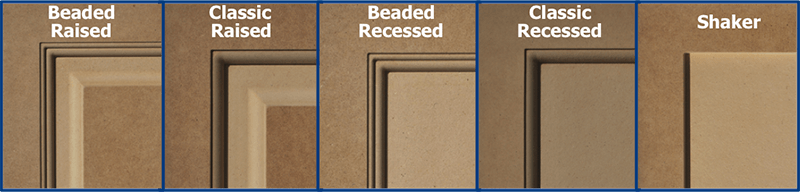
Wainscoting America panels are made from 5/8" thick premium MDF which is ideal for intricate details.
Poplar is the molding choice because it is a medium weight wood with good strength and great painting characteristics
2) Determine the Total Height of your wainscoting panels
-
The rule of thumb is that the wainscoting panels are usually 1/3 the height of the wall. Our starting default height for the wainscoting panels is 34 1/2" (without the top cap lip).
- Look around the room for obstacles that might influence the desired wainscoting height such as wall switch plates. It is usually best to stay just below the switch plates if possible.
- The 3 1/4" top cap has a 3/4" lip and the 1 5/8" top cap has a 5/8" lip. You will add this lip dimension to the top of your panels to determine the total height.
- Subtract the top cap lip from your total height to calculate the Wainscoting panel height (Dimension B).
3) Determine Top Rail Wainscoting Height
- The starting default top rail is 4 1/2 inches, which is the flat of the top rail.
- The 3 1/4" Top cap will over lap this top rail by 2 1/2" and the 1 5/8" top cap will overlap this top rail by 1".
4) Determine Bottom Rail Wainscoting Height
- The starting default bottom rail is 7 1/2 inches, which is the flat of the bottom rail.
- For most applications the 7 1/2" bottom rail does not need to be altered.
- If you are going to use a large baseboard molding you might need to increase the bottom rail.
- If you baseboard heating elements you will need to adjust the bottom rail and the height of the panel.
5) Determine Standard Left, Middle and Right Stile Widths
- The starting default left, middle and right stiles are 3 1/2 inches, which is the flat of the stiles. Refer to the wainscoting profiles for details.
6) Measure Room Layout as shown in the following example

7) Inner Corner Adjustments
- When two Wainscoting panels meet at an inside corner you will want to add 5/8" to the stile width of the first Wainscoting Panel and you will want to reduce the length of the second Wainscoting Panel by 5/8"
8) Outer Panel Adjustments
- For an outside corner we recommend using a butt joint. Add 5/8" to the length of one panel so the second panel can butt into the back of it. It is also best to reduce the stile width of the second panel by 5/8" which is the thickness of the first panel.
9) Windows with Existing Trim
- When you are going to use existing window trim we recommend sectioning into a panel below the window and panels to the left and right of the window trim.
- We also recommend making the stiles that meet at these joints under the window smaller on each panel so that the sum of the two stiles will add up to 3 1/2 inches. Example: make the left and right stiles on the panel under the window 1/2 inches and make the stiles on the panels that touch the window casing 3 inches.... so the two stiles that meet will add up to a total of 3 1/2 inches.
10) Windows / Doors with Pediment Heads and Pilasters
- When adding pilaster trim to your windows and doors you will need to compensate for the width of the pilasters and for the 1/4" reveal between the window / door jamb and the pilaster for each window / door jamb.